This post is the third in my series about setting up a Gatsby blog. In the first post, I go through how to set up the blog running locally using Gatsby. The second post covers the steps needed to move the blog to DigitalOcean’s App Platform.
With your blog accessible through DigitalOcean, it is now time to also make it accessible from your own domain. This is relatively simple, but as mentioned in my first post in this series you do need to make use of a bit of “DNS magic” to make the blog accessible from your root domain.
Updating DNS records
The first step is to update the DNS record of your DNS provider. My DNS provider is Cloudflare, but any DNS provider is fine for these initial steps.
- Log in to the Digital Ocean App Platform
- Go to the
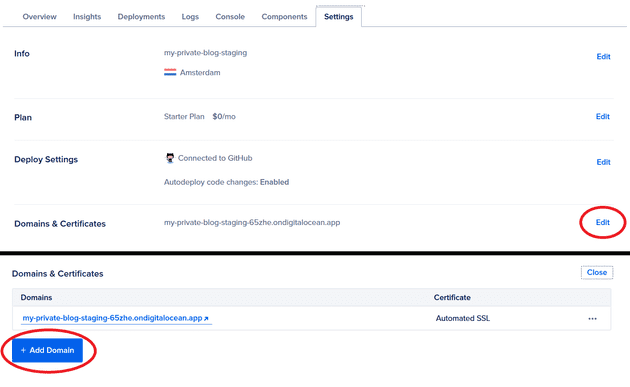
Settingstab for your blog on App Platform, editDomains & Certificates, and add a new domain.
- Fill in the domain and subdomain of your blog. Note down the CNAME alias. Click
Add Domain.
- Go to your DNS provider and add a CNAME record to ensure that the subdomain acts as an alias
for the CNAME alias noted down in the step above.
In Cloudflare, this is done by going to the DNS tab of your website and clicking the
Add Recordbutton.
 Note that proxying has been turned off for the subdomain.
This is a Cloudflare specific thing and is only needed if you also want your blog
to be accessible through your root domain.
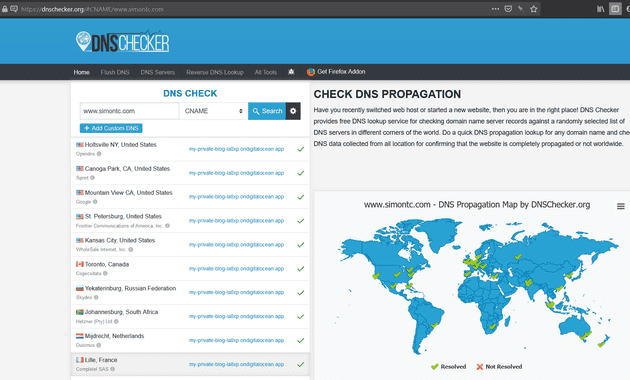
Having performed these steps and saved, you now just have to wait for the DNS changes to be propagated throughout the web. This will take some time depending on your DNS provider.
To get an indication of how far the changes have propagated you can go to https://dnschecker.org/#CNAME/<blog_url>
where blog_url is the url of your blog.
This will check whether your new CNAME record has been propagated throughout the web
Make the blog accessible through your root domain
Now your blog is available on a subdomain such as www.simontc.com or blog.simontc.com.
However, if someone tries to access your blog through the root domain (simontc.com) they will be disappointed since
nothing is there.
This is where DNS flattening comes into play and is why your DNS provider should offer this. To enable this in the Cloudflare DNS you need to add a second CNAME record. The name of this should be the root domain (@) and should have your subdomain as a target. Most importantly this needs to be proxied through Cloudflare:
You are not quite done yet though. If you try to access your blog through the root domain you most likely will be met by an error like this:
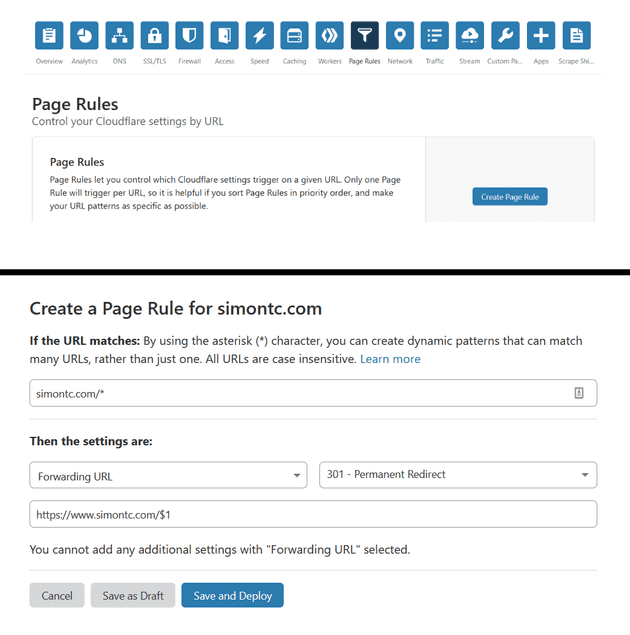
To fix this, you need to go to the Page Rules tab in Cloudflare and create a new redirect rule where you redirect from the
root domain to your subdomain. /* and /$1 ensures that redirects work for all URLs on your blog.
Congratulations! With this final change, your blog is now available on both your subdomain and your root domain. You can now lean back and enjoy the thousands of readers that will flock to your site to read your words of wisdom. Or you can be like me and continue tinkering with the site…
In any case, this was the last post in my series about the steps I took to get my blog up and running using Gatsby, DigitalOcean App Platform, and Cloudflare. I hope it has been informative. If you have any questions or comments, don’t hesitate to reach out to me on Twitter.


